
このように、SegmentedPickerを使って画面を切り替える方法をこの記事で解説していきたいと思います。
実装方法
セグメンテッドピッカーを作る
struct ContentView: View {
    @State private var selectedIndex = 0

    var body: some View {
        VStack {
            Picker("", selection: $selectedIndex) {
                Text("赤のView")
                    .tag(0)
                Text("青のView")
                    .tag(1)
            }
            .pickerStyle(.segmented)
            .padding()
            // ここにView
        }
    }
}
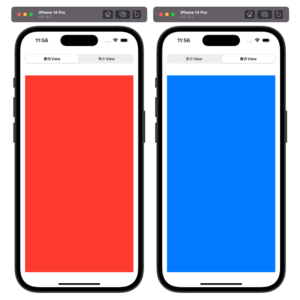
切り替えたいViewを作る
struct ContentView: View {
    @State private var selectedIndex = 0

    var body: some View {
        VStack {
            Picker("", selection: $selectedIndex) {
                Text("赤のView")
                    .tag(0)
                Text("青のView")
                    .tag(1)
            }
            .pickerStyle(.segmented)
            .padding()

            if selectedIndex == 0 {
                Rectangle()
                    .frame(maxWidth: .infinity, maxHeight: .infinity)
                    .foregroundColor(.red)
                    .padding()
            } else {
                Rectangle()
                    .frame(maxWidth: .infinity, maxHeight: .infinity)
                    .foregroundColor(.blue)
                    .padding()
            }
        }
    }
}