この記事ではCollectionViewの実装方法を紹介します。
Contents
UICollectionViewとは
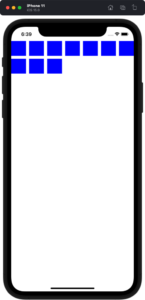
簡単に言うと、左上詰めのリストみたいなイメージです。左上詰めでセルが配置されます。
UICollectionViewの実装方法
1. カスタムセルを使わない実装方法
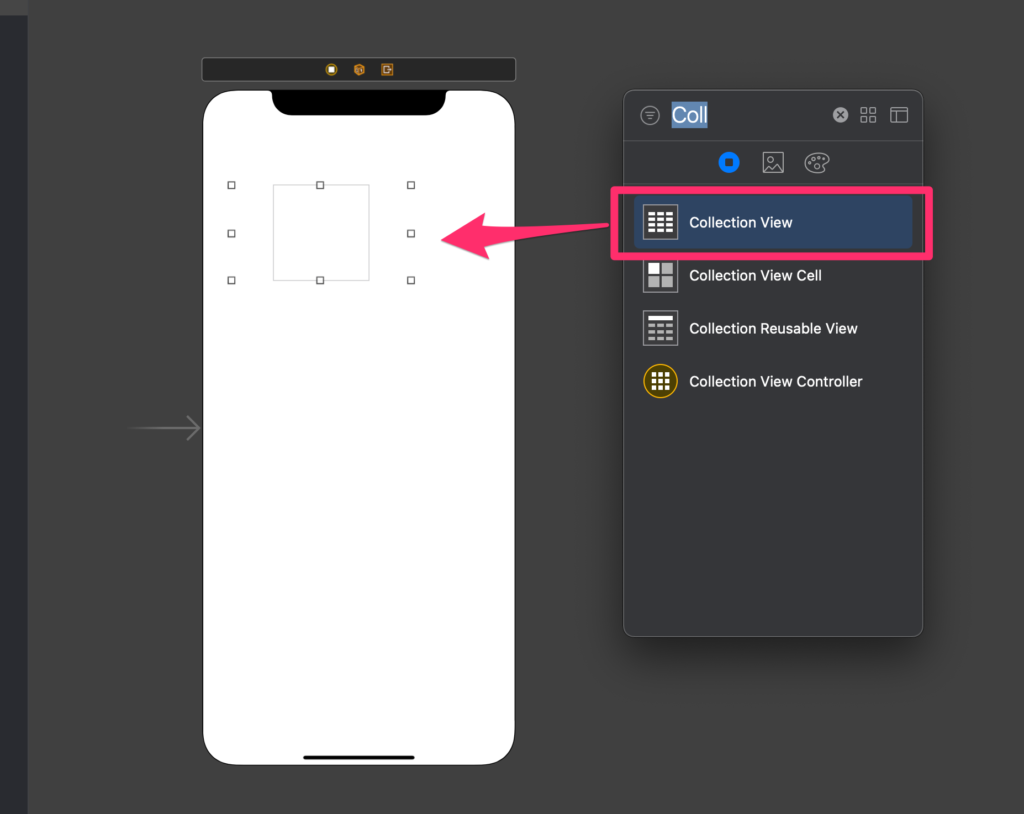
まずはCollectionViewを配置します。
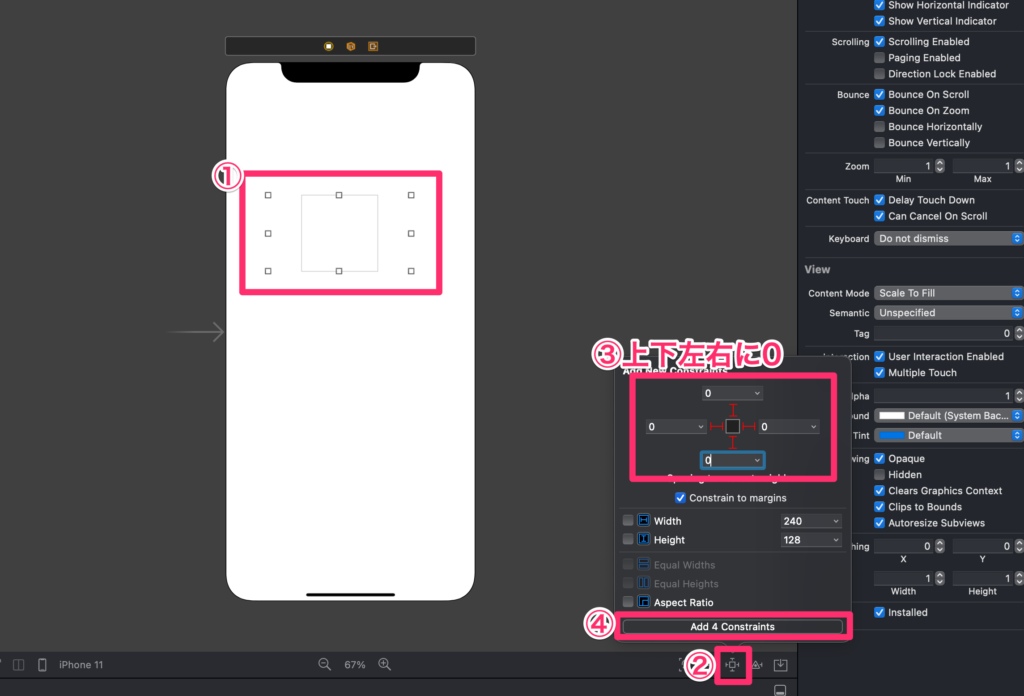
AutoLayoutをつけます。
①UICollectionViewを選択
② ![]() (Add New Constraint)をクリック
(Add New Constraint)をクリック
③上下左右に0を入力
④Add 4 Constraintsをクリック
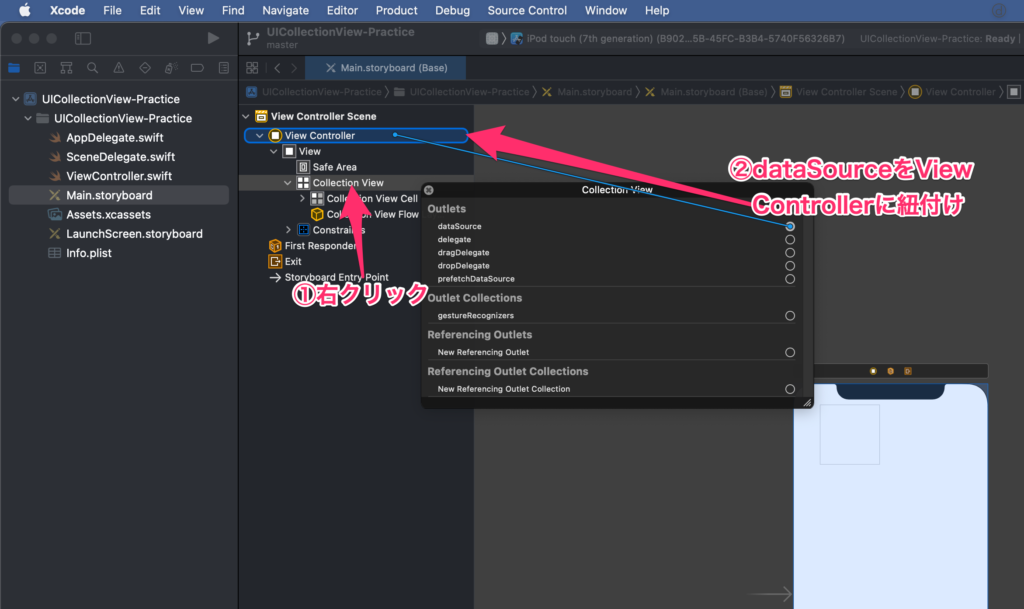
①CollectionViewを右クリック
②dataSourceの右側の丸ぽちををViewControllerにドラッグ&ドロップ
同じく、delegateも行います。
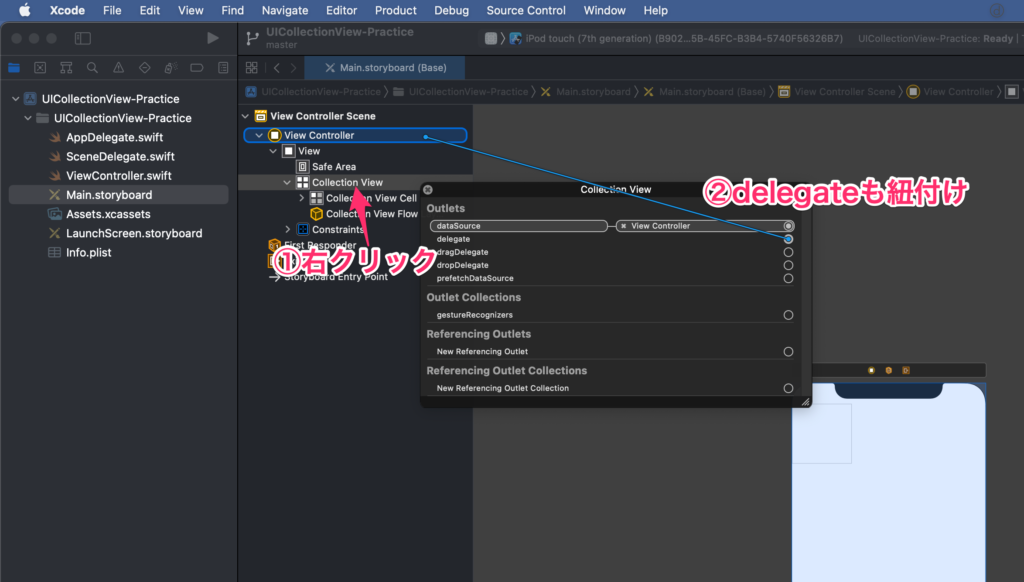
①CollectionViewを右クリック
②delegateの右側の丸ぽちををViewControllerにドラッグ&ドロップ
delegateとdataSourceの紐付けは、コードでも以下のように記述すれば(IBOutletで紐付けしてから)OKです。自分はStoryboardで紐付けしちゃうことが多いです。
collectionView.delegate = self
collectionView.dataSource = self
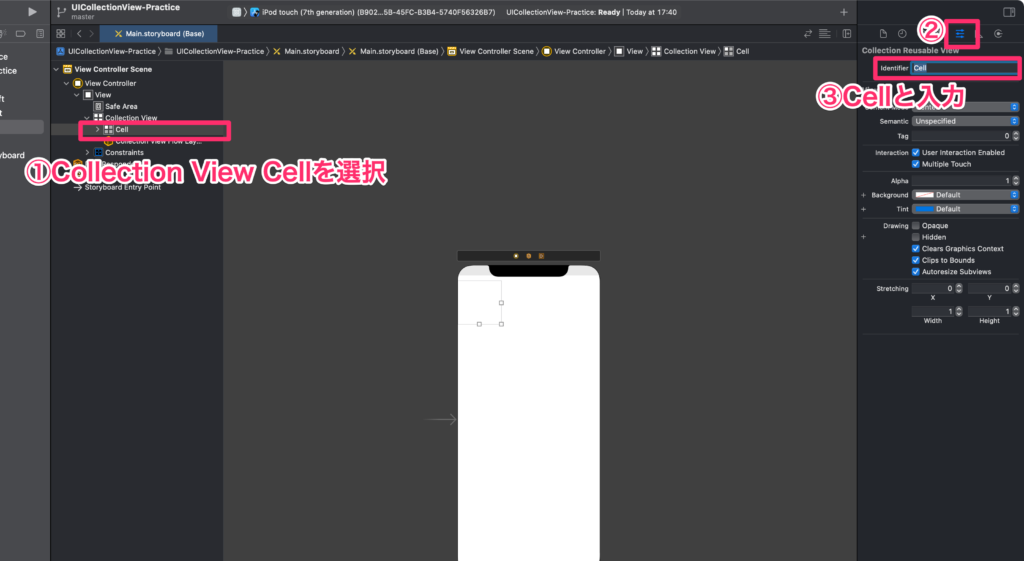
①Collection View Cellを選択
② ![]() (Show The Attributes inspector)をクリック
(Show The Attributes inspector)をクリック
③Cellと入力
ViewController.swiftに、以下のようにextensionでコードを記述しましょう。
extension ViewController: UICollectionViewDelegate, UICollectionViewDataSource {
    func numberOfSections(in collectionView: UICollectionView) -> Int {
        return 1
    }

    func collectionView(_ collectionView: UICollectionView, numberOfItemsInSection section: Int) -> Int {
        return 10
    }

    func collectionView(_ collectionView: UICollectionView, cellForItemAt indexPath: IndexPath) -> UICollectionViewCell {
        let cell = collectionView.dequeueReusableCell(withReuseIdentifier: "Cell", for: indexPath)
        cell.backgroundColor = .blue

        return cell
    }
}
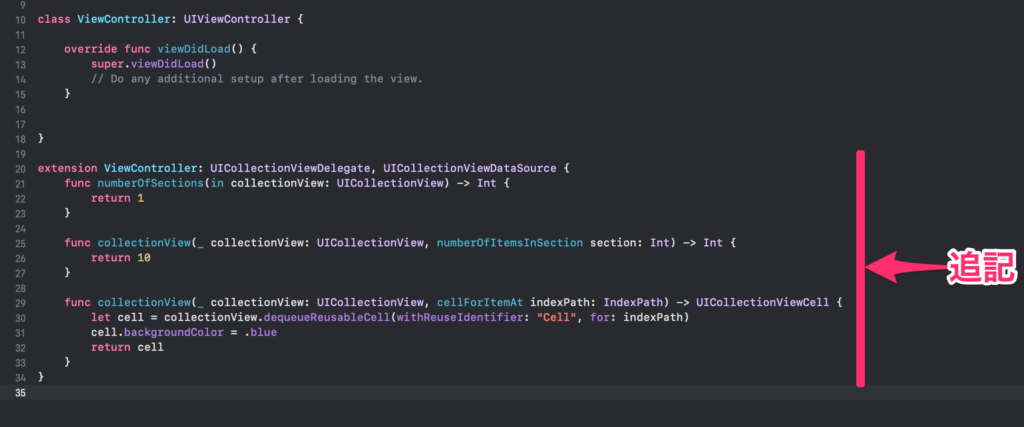
ざっくり説明すると、numberOfSectionsは、セクションの数で、numberOfItemsInSectionは、セルの数です。
collectionView.dequeueReusableCell(withReuseIdentifier: "Cell", for: indexPath)で、Storyboardに紐付けたセルを呼んでいます。

実行して確認してみましょう。
このように、青のセルが表示されてるかと思います。
これで、UICollectionViewの実装が出来ました。
2. カスタムセルを使った実装方法
カスタムセルを使った実装方法というのは、セルを一つのファイルとして切り出すという実装方法のことです。
一つのファイルで切り出すことにより、より複雑な装飾ができたり、複数のコレクションビューに使ったり、修正や管理しやすくなります。自分は、CollectionViewを使うときは必ずカスタムセルを使った実装を行います。
上記のカスタムセルを使わない実装方法のSTEP.3までは同じなので省きます。
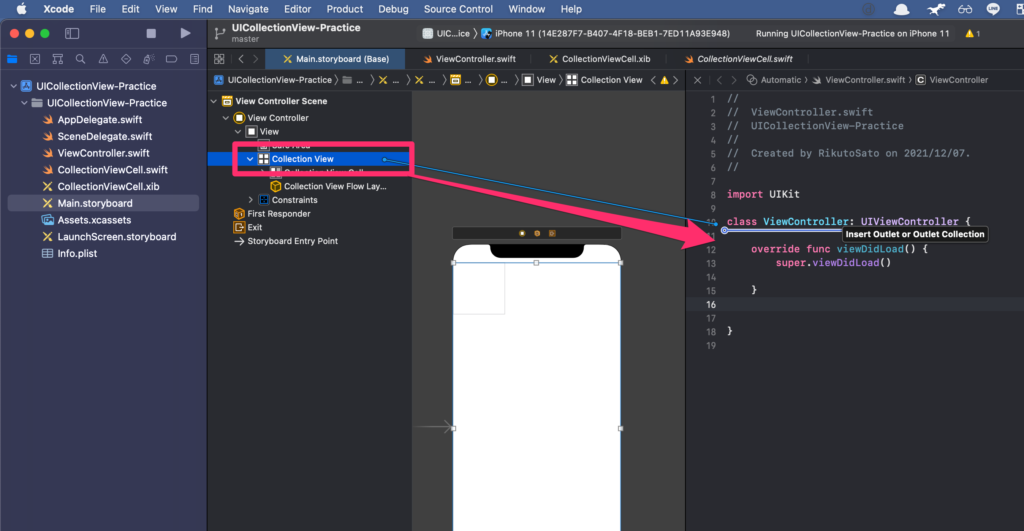
command + option + control + enterで二分割して、CollectionViewを紐付けましょう。
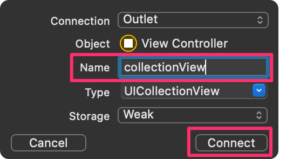
NameにcollectionViewと入力し、Connectをクリック
まずは、セルだけのファイルを作成します。
command + nを押して新規ファイルウィンドウを開きましょう。
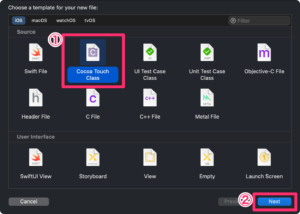
①Cocoa Touch Classを選択
②Nextをクリック
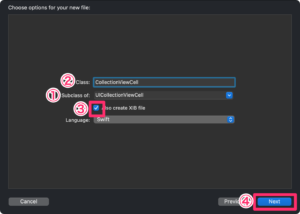
①Subclass ofをUICollectionViewCellに変更
②CollectionViewCellと入力されていることを確認
③Also create XIB fileのチェックをONにする
④Nextをクリック
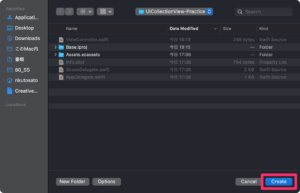
そのままCreateをクリック
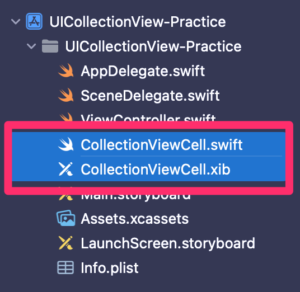
これでファイルが二つ追加されたと思います。

①CollectionViewCell.xibを選択
②Collection View Cellを選択
③ ![]() (Show The Attributes inspector)をクリック
(Show The Attributes inspector)をクリック
④CustomCellと入力
わかりやすいように背景色を青にしておきます。
CollectionViewCell.swiftのawakeFromNib()に以下のコードを追記しましょう。
backgroundColor = .blue
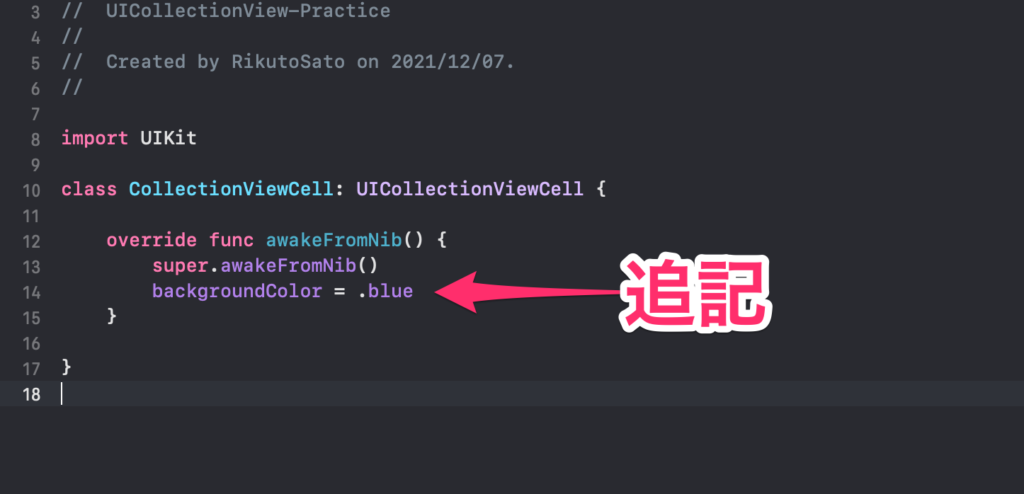
ここで色々とセルの装飾を行います。
ViewController.swiftのViewDidLoad()に以下のコードを記述
collectionView.register(UINib(nibName: "CollectionViewCell", bundle: nil), forCellWithReuseIdentifier: "CustomCell")

これで別ファイルのカスタムセルをViewControllerに登録しているイメージです。
引き続きViewController.swiftに、extensionで以下のコードを記述しましょう。
extension ViewController: UICollectionViewDelegate, UICollectionViewDataSource {
    func numberOfSections(in collectionView: UICollectionView) -> Int {
        return 1
    }

    func collectionView(_ collectionView: UICollectionView, numberOfItemsInSection section: Int) -> Int {
        return 10
    }

    func collectionView(_ collectionView: UICollectionView, cellForItemAt indexPath: IndexPath) -> UICollectionViewCell {
        let cell = collectionView.dequeueReusableCell(withReuseIdentifier: "CustomCell", for: indexPath) as! CollectionViewCell
        return cell
    }
}
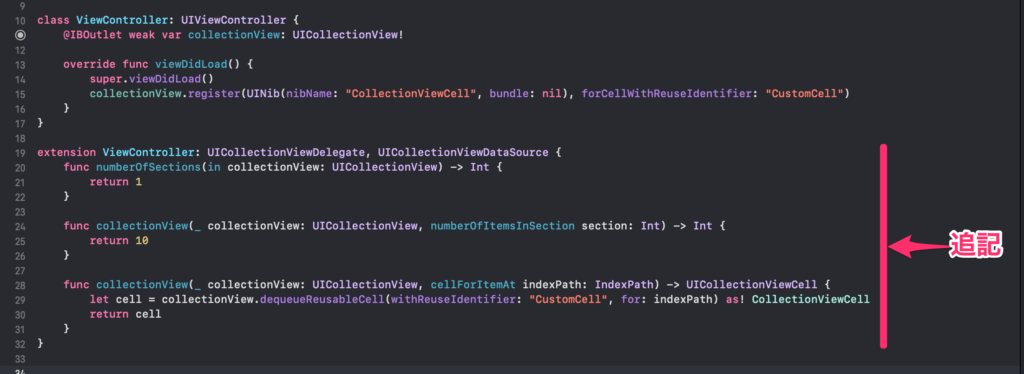
ポイントは、cellという変数に、as! CollectionViewCellでインスタンスを生成しているところです。

このように、同じようにCollectionViewが表示されているかと思います。
では、もう少し装飾してみましょう。CollectionViewCellにLabelを配置しましょう。
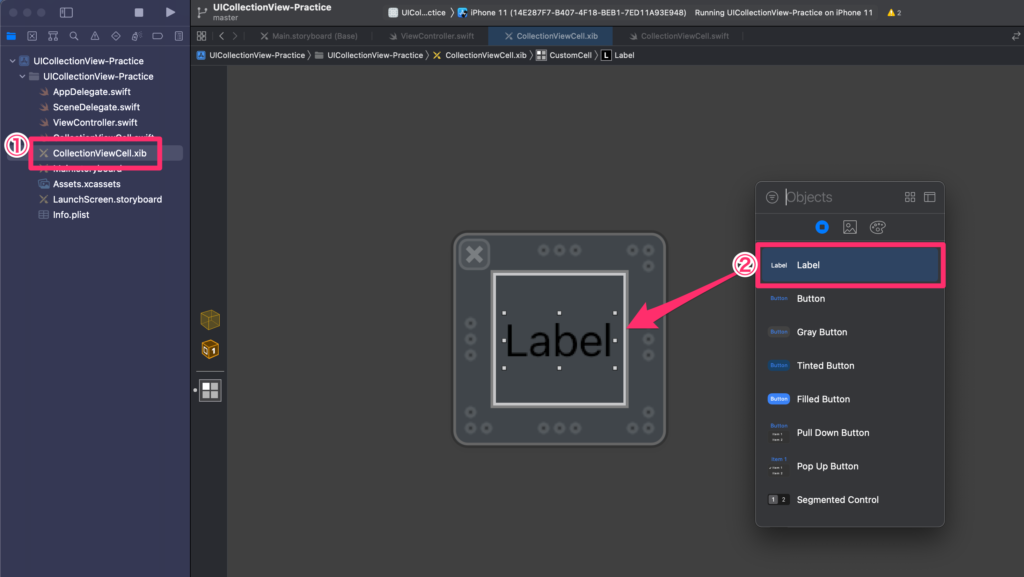
①CollectionViewCell.xibを選択
②Labelを適当に配置
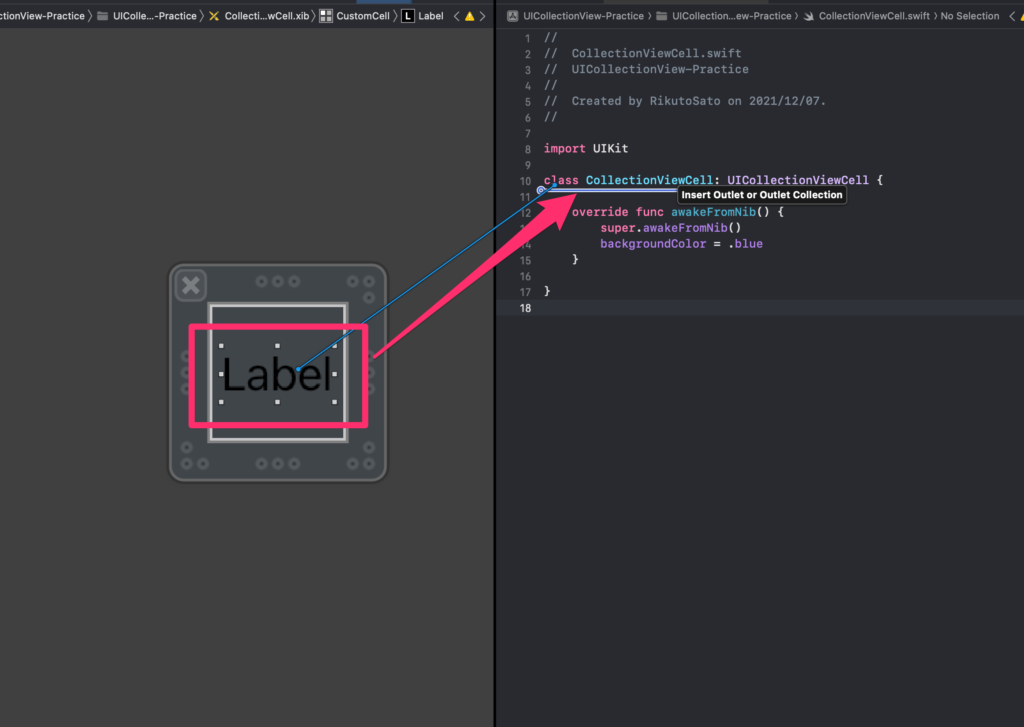
command + option + control + enterで二分割して、labelを紐付けましょう。
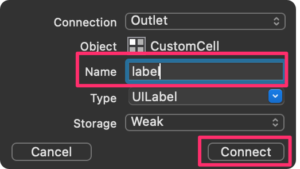
Nameにlabelと入力し、Connectをクリック
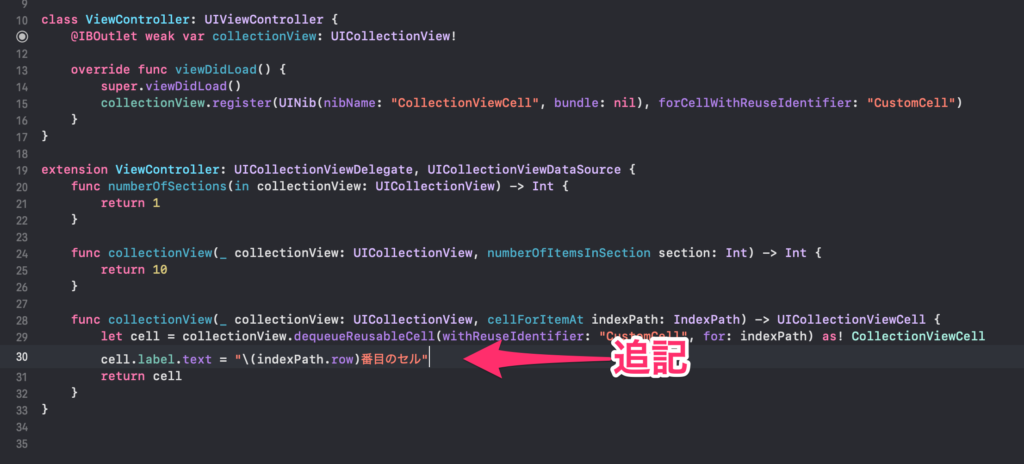
ViewController.swiftのcollectionViewのセルの内容を決める関数に以下のコードを記述
cell.label.text = "\(indexPath.row)番目のセル"
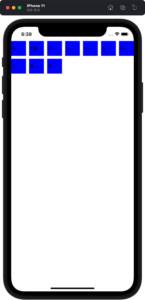
これで、このように、Labelに◯番目のセルと表示されているかと思います。
文字が大きすぎて、…になってしまっていますが、、、
これで、カスタムセルを使ったUICollectionViewの実装が出来ました。
1つの画面に2つのUICollectionViewを並べる方法
 【Xcode/Swift】一つの画面で複数のUICollectionViewを扱う方法
![]()
UICollectionViewを使う上で知っておきたいこと
タップ判定を取得
func collectionView(_ collectionView: UICollectionView, didSelectItemAt indexPath: IndexPath) {
    print("タップされたよ")
}
セルのサイズを変更する
まずは、UICollectionViewDelegateFlowLayoutを継承
extension ViewController: UICollectionViewDelegate, UICollectionViewDataSource, UICollectionViewDelegateFlowLayout {
以下のコードでセルの高さと幅を変更
func collectionView(_ collectionView: UICollectionView, layout collectionViewLayout: UICollectionViewLayout, sizeForItemAt indexPath: IndexPath) -> CGSize {
    return CGSize(width: 100, height: 100)
}
スクロールをリセット(一番上に戻す)
UIScrollViewをExtensionする
extension UIScrollView {
    func resetScrollPositionToTop() {
        self.contentOffset = CGPoint(x: -contentInset.left, y: -contentInset.top)
    }
}
以下のように使う
self.collectionView.resetScrollPositionToTop()
セルのイベントを無効にする
collectionView.isUserInteractionEnabled = false
参考文献


