この記事では、ログを出力するライブラリ、XCGLoggerの使い方について簡単なアプリを作りながら解説していきます。
実装方法
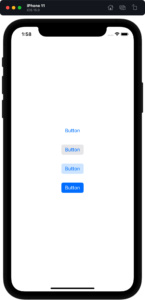
ボタンをいくつか配置して、コードに@IBActionで紐付けます。
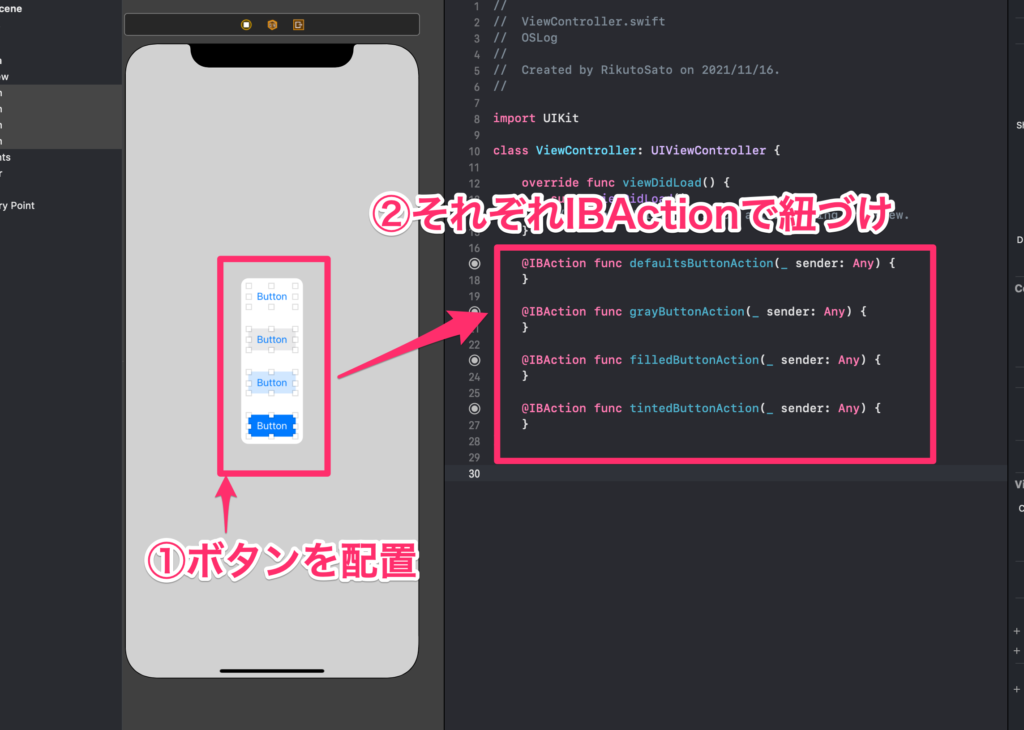
①ボタンを適当にいくつか配置。
②それぞれボタンを異なる名前で@IBActionで紐付け。
まずは、CocoaPodsでXCGLoggerをプロジェクトに追加する。
pod 'XCGLogger'
CocoaPodsで追加する方法については以下の記事を参考にしてください。
 【Xcode/Swift】CocoaPodsの使い方を徹底解説
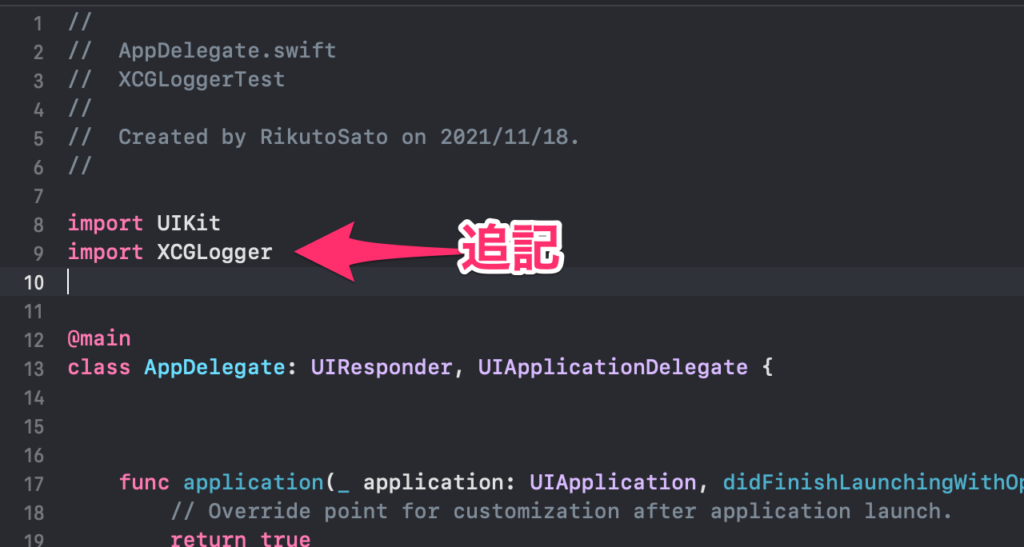
まずは、AppDelegate.swiftにimportしましょう。
import XCGLogger
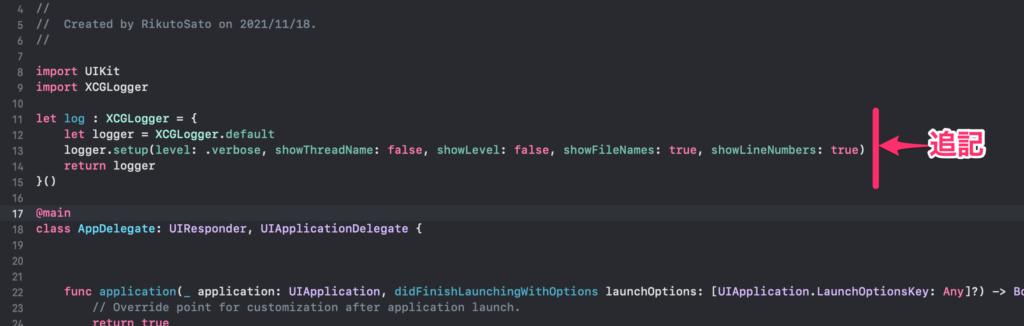
AppDelegate.swiftに以下のコードを追記しましょう。
let log : XCGLogger = {
    let logger = XCGLogger.default
    logger.setup(level: .verbose, showThreadName: false, showLevel: false, showFileNames: true, showLineNumbers: true)
    return logger
}()
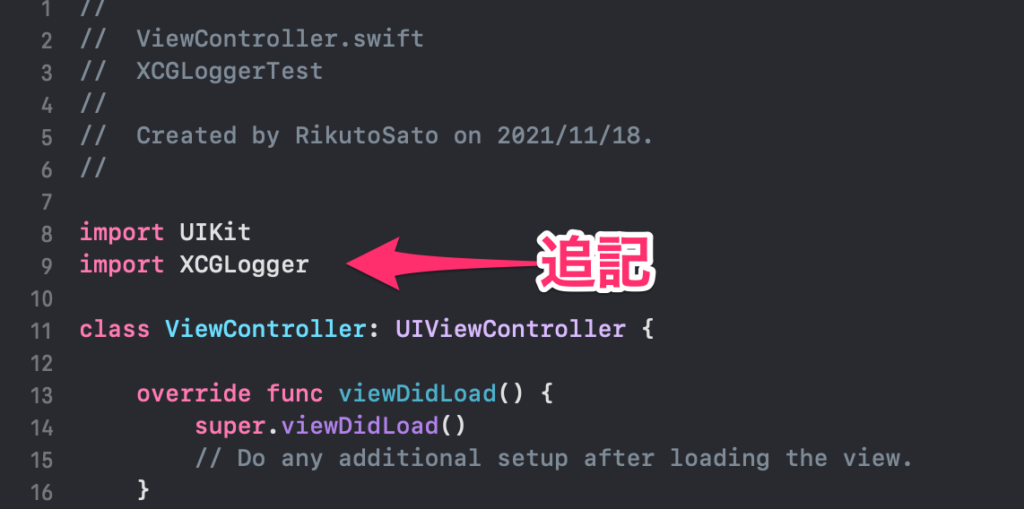
まずは、ViewController.swiftにもimportしましょう。
import XCGLogger
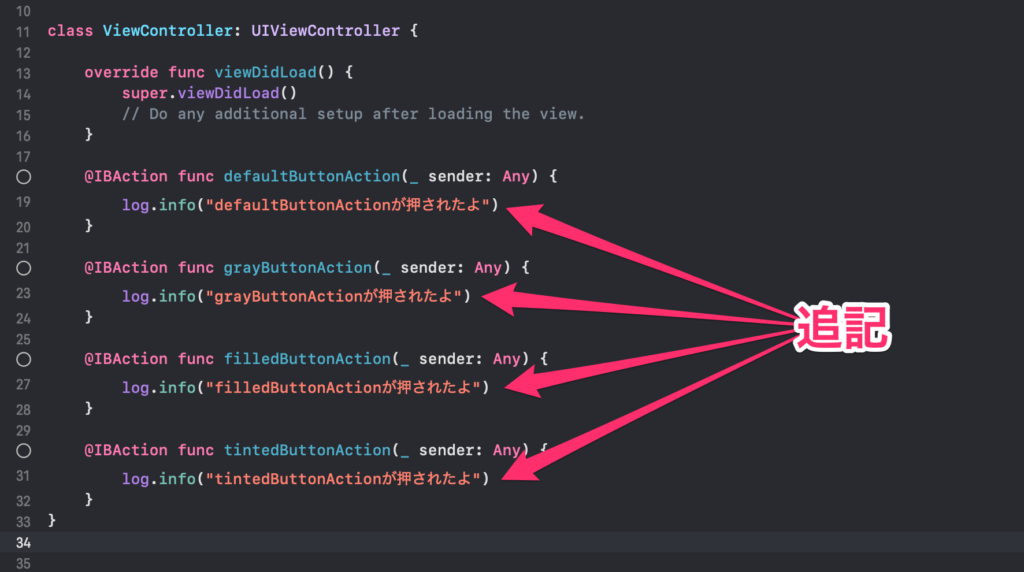
以下コードでログ出力ができます。それぞれのボタンを押したときに呼び出しましょう。
log.info("defaultButtonActionが押されたよ")
実行して確認しましょう。

ボタンを押すと、そのボタンを押した時刻とクラス名、行数、関数、メッセージが表示されます。
これでXCGLoggerでログがとることができました。
import UIKit
import XCGLogger

let log : XCGLogger = {
    let logger = XCGLogger.default
    logger.setup(level: .verbose, showThreadName: false, showLevel: false, showFileNames: true, showLineNumbers: true)
    return logger
}()

@main
class AppDelegate: UIResponder, UIApplicationDelegate {


    func application(_ application: UIApplication, didFinishLaunchingWithOptions launchOptions: [UIApplication.LaunchOptionsKey: Any]?) -> Bool {
        // Override point for customization after application launch.
        return true
    }

    // MARK: UISceneSession Lifecycle

    func application(_ application: UIApplication, configurationForConnecting connectingSceneSession: UISceneSession, options: UIScene.ConnectionOptions) -> UISceneConfiguration {
        // Called when a new scene session is being created.
        // Use this method to select a configuration to create the new scene with.
        return UISceneConfiguration(name: "Default Configuration", sessionRole: connectingSceneSession.role)
    }

    func application(_ application: UIApplication, didDiscardSceneSessions sceneSessions: Set<UISceneSession>) {
        // Called when the user discards a scene session.
        // If any sessions were discarded while the application was not running, this will be called shortly after application:didFinishLaunchingWithOptions.
        // Use this method to release any resources that were specific to the discarded scenes, as they will not return.
    }


}
import UIKit
import XCGLogger

class ViewController: UIViewController {

    override func viewDidLoad() {
        super.viewDidLoad()
        // Do any additional setup after loading the view.
    }

    @IBAction func defaultButtonAction(_ sender: Any) {
        log.info("defaultButtonActionが押されたよ")
    }

    @IBAction func grayButtonAction(_ sender: Any) {
        log.info("grayButtonActionが押されたよ")
    }

    @IBAction func filledButtonAction(_ sender: Any) {
        log.info("filledButtonActionが押されたよ")
    }

    @IBAction func tintedButtonAction(_ sender: Any) {
        log.info("tintedButtonActionが押されたよ")
    }
}
ですが、これだけだと、OSLogと変わらないので、XCGLoggerならできることをやっていきましょう。取得したログをiPhoneのストレージに保存してみましょう。
取得したログをファイルに保存する
AppDelegateのClass中に以下のコードを追記
let documentsDirectory: URL = {
    let urls = FileManager.default.urls(for: .documentDirectory, in: .userDomainMask)
    return urls[urls.endIndex - 1]
}()

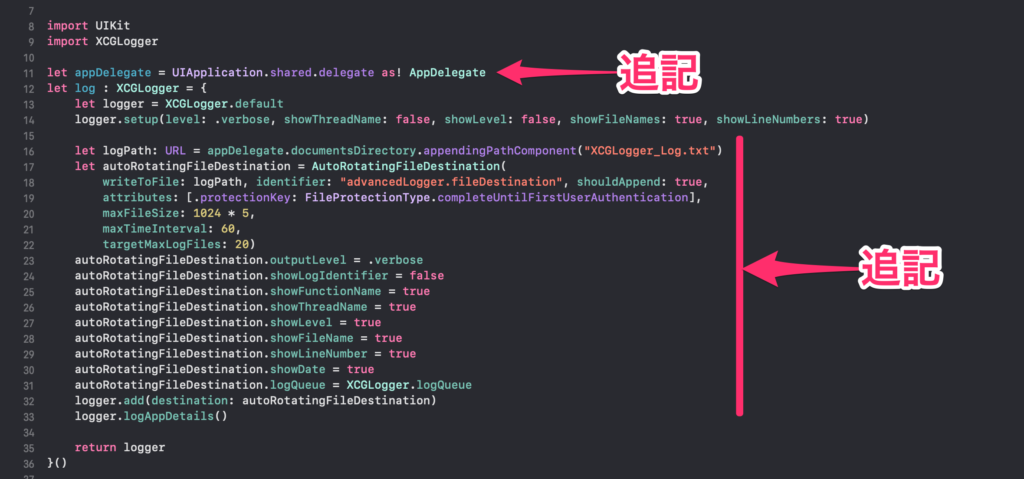
AppDelegate.swiftを以下のように書き換える
let appDelegate = UIApplication.shared.delegate as! AppDelegate
let log : XCGLogger = {
    let logger = XCGLogger.default
    logger.setup(level: .verbose, showThreadName: false, showLevel: false, showFileNames: true, showLineNumbers: true)

    let logPath: URL = appDelegate.documentsDirectory.appendingPathComponent("XCGLogger_Log.txt")
    let autoRotatingFileDestination = AutoRotatingFileDestination(
        writeToFile: logPath, identifier: "advancedLogger.fileDestination", shouldAppend: true,
        attributes: [.protectionKey: FileProtectionType.completeUntilFirstUserAuthentication],
        maxFileSize: 1024 * 5,
        maxTimeInterval: 60,
        targetMaxLogFiles: 20)
    autoRotatingFileDestination.outputLevel = .verbose
    autoRotatingFileDestination.showLogIdentifier = false
    autoRotatingFileDestination.showFunctionName = true
    autoRotatingFileDestination.showThreadName = true
    autoRotatingFileDestination.showLevel = true
    autoRotatingFileDestination.showFileName = true
    autoRotatingFileDestination.showLineNumber = true
    autoRotatingFileDestination.showDate = true
    autoRotatingFileDestination.logQueue = XCGLogger.logQueue
    logger.add(destination: autoRotatingFileDestination)
    logger.logAppDetails()

    return logger
}()
これで、ローカルのファイルにログが蓄積されていきます。
実行してシミュレーターでボタンを押してみましょう。
(グレーのボタンを連打します。)
ターミナルに以下のコマンドを打ってみてください。
open /Users/${USER}/Library/Developer/CoreSimulator/Devices/
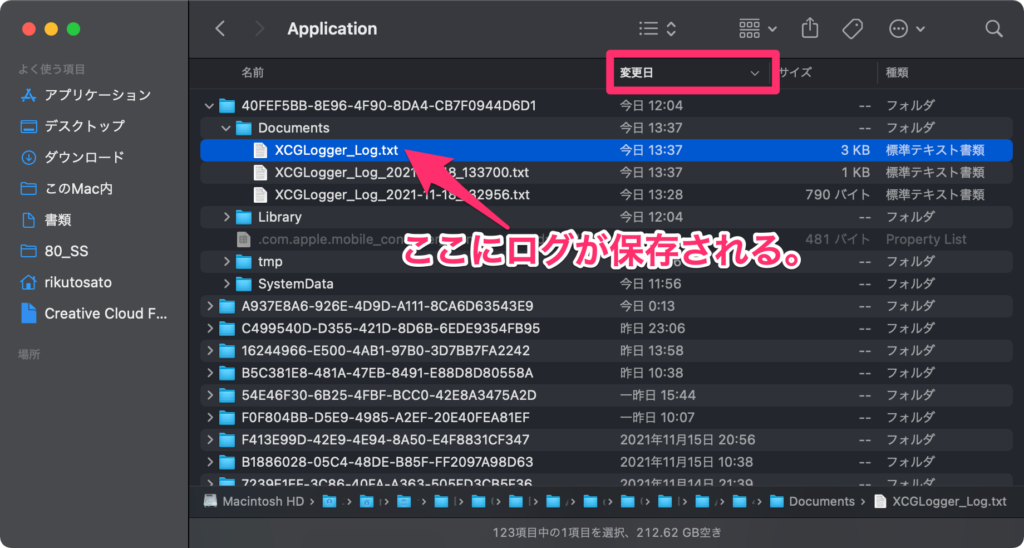
そうするとFinderが開くので、そこから先ほど実行したシミュレーターを探してください。
command + 2を押してリスト表示にして変更日を押すと、先ほど触ったシミュレーターが一番上に出てきます。そのシミュレーターの中のDocumentsフォルダーの中に、ログファイルが格納されています。
こんな感じにログが表示されます。グレーボタン連打が確認できました。

これでログがiPhoneのファイル内に保存することができました。
import UIKit
import XCGLogger

let appDelegate = UIApplication.shared.delegate as! AppDelegate
let log : XCGLogger = {
    let logger = XCGLogger.default
    logger.setup(level: .verbose, showThreadName: false, showLevel: false, showFileNames: true, showLineNumbers: true)

    let logPath: URL = appDelegate.documentsDirectory.appendingPathComponent("XCGLogger_Log.txt")
    let autoRotatingFileDestination = AutoRotatingFileDestination(
        writeToFile: logPath, identifier: "advancedLogger.fileDestination", shouldAppend: true,
        attributes: [.protectionKey: FileProtectionType.completeUntilFirstUserAuthentication],
        maxFileSize: 1024 * 5,
        maxTimeInterval: 60,
        targetMaxLogFiles: 20)
    autoRotatingFileDestination.outputLevel = .verbose
    autoRotatingFileDestination.showLogIdentifier = false
    autoRotatingFileDestination.showFunctionName = true
    autoRotatingFileDestination.showThreadName = true
    autoRotatingFileDestination.showLevel = true
    autoRotatingFileDestination.showFileName = true
    autoRotatingFileDestination.showLineNumber = true
    autoRotatingFileDestination.showDate = true
    autoRotatingFileDestination.logQueue = XCGLogger.logQueue
    logger.add(destination: autoRotatingFileDestination)
    logger.logAppDetails()

    return logger
}()

@main
class AppDelegate: UIResponder, UIApplicationDelegate {

    let documentsDirectory: URL = {
        let urls = FileManager.default.urls(for: .documentDirectory, in: .userDomainMask)
        return urls[urls.endIndex - 1]
    }()

    func application(_ application: UIApplication, didFinishLaunchingWithOptions launchOptions: [UIApplication.LaunchOptionsKey: Any]?) -> Bool {
        // Override point for customization after application launch.
        return true
    }

    // MARK: UISceneSession Lifecycle

    func application(_ application: UIApplication, configurationForConnecting connectingSceneSession: UISceneSession, options: UIScene.ConnectionOptions) -> UISceneConfiguration {
        // Called when a new scene session is being created.
        // Use this method to select a configuration to create the new scene with.
        return UISceneConfiguration(name: "Default Configuration", sessionRole: connectingSceneSession.role)
    }

    func application(_ application: UIApplication, didDiscardSceneSessions sceneSessions: Set<UISceneSession>) {
        // Called when the user discards a scene session.
        // If any sessions were discarded while the application was not running, this will be called shortly after application:didFinishLaunchingWithOptions.
        // Use this method to release any resources that were specific to the discarded scenes, as they will not return.
    }


}
import UIKit
import XCGLogger

class ViewController: UIViewController {

    override func viewDidLoad() {
        super.viewDidLoad()
        // Do any additional setup after loading the view.
    }

    @IBAction func defaultButtonAction(_ sender: Any) {
        log.info("defaultButtonActionが押されたよ")
    }

    @IBAction func grayButtonAction(_ sender: Any) {
        log.info("grayButtonActionが押されたよ")
    }

    @IBAction func filledButtonAction(_ sender: Any) {
        log.info("filledButtonActionが押されたよ")
    }

    @IBAction func tintedButtonAction(_ sender: Any) {
        log.info("tintedButtonActionが押されたよ")
    }
}
参考文献
他にもログを出力させる記事があるので、みてみてください。
 【Xcode/Swift】Firebase Crashlyticsでクラッシュログを収集する方法
 【Xcode/Swift】OSLogを使ってアプリログを出力する方法(ロギング)